The PLATO Keyboard
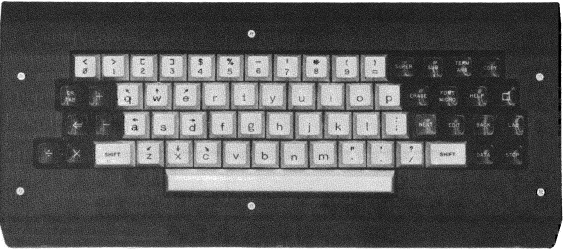
Every PLATO terminal has a keyboard like the one pictured above. The keyboard has a number of special features which are closely related to certain aspects of the TUTOR language, such as the HELP key which allows students to access optional sections of a lesson written in TUTOR.
The central white keys include letters, the numbers 0 through 9 along the top row, and punctuation marks. Note that the numbers 0 and 1 are different from the letters o and 1. The zero has a slash through it to distinguish it unmistakably from the letter o. Except for these distinctions, the white keys are the same as the keys on a standard typewriter. Capital letters are typed by pressing either of the SHIFT keys while striking a letter key. Some keys show two different characters, such as the keys in the upper row, e.g., depressing a SHIFT key while striking a “4” produces a “$”. 1)
Eight of the letter keys (d, e, w, q, a, z, x, and c all clustered around the s key) have arrows marked on them pointing in the eight compass directions. Typing “e” with a SHIFT key depressed normally produces a capital “E” on the screen, not a northeast arrow. The directional arrows are shown because these keys are sometimes used to control the motion of a cursor or pointer on the screen. In this context, the student presses an un-shifted “e” and the lesson interprets this as a command to move a cursor northeast on the screen, rather than a command to display an “e” on the screen. Such redefinitions of what a key should do in a particular context provide enormous flexibility. Another interesting example is the use of the keyboard to type Russian text in the Cyrillic alphabet.
Spaces (blank characters) are produced by striking the long “space bar” at the bottom of the keyboard. Holding down a shift key while hitting the space bar produces a backspace. An example of the backspace's use is in underlining. The underlined word “cat” is produced by typing “c”, “a”, “t”, backspace, backspace, backspace, underline, underline, underline (underline is shift-6, not to be confused with the minus sign or dash). Typing “T”, backspace, “H”, will superimpose the two letters. The backspace is used for superimposing characters, whereas the ERASE key (just to the right of the letter p) is used to correct typing errors.
A few black keys on the left side of the keyboard are mainly associated with mathematical operations: they include plus, minus (also used as a dash), times and divide is equivalent to the slash /). The is used in TUTOR calculations to assign values to variables. The TAB key is most often used by authors writing lessons rather than by students studying lessons. The TAB key's function is similar to the tabulate function on standard typewriters, e.g., pressing TAB once is equivalent to hitting the space bar as many times as is necessary to reach a preset column on the screen. Shift-TAB, called CR for “carriage return”, to continue the typewriter analogy, moves typing down one line and to the left margin. Shift-plus produces a 2 (which means summation in mathematical notation) and shift-minus produces a A (which means difference in mathematical notation).
The black keys at the right of the keyboard are called “function” keys because they carry out various functions rather than displaying a character on the screen. By far the most important function key is NEXT. The cardinal rule for studying PLATO lessons is “When in doubt, press NEXT.” Pressing NEXT causes the next logical thing to happen, such as proceeding on to a new display, asking for a response to be judged, erasing an entire incorrect response, etc. The second most important function key is ERASE, which is used to correct typing errors. Each press of ERASE erases one character from the screen. Pressing shift-ERASE (abbreviated as ERASE1) erases an entire word rather than a single character. Note the difference from the backspace (shift-space) which does not erase and is used for superimposing characters.
The EDIT key is also used for correcting typing. Suppose you have typed “the quik brown fox” when you notice the missing “c” in “quick”. You could press ERASE1 twice to erase “fox” and “brown”, use ERASE to get rid of the “k”, then retype “ck brown fox”. The EDIT key makes such retyping unnecessary. Instead of hitting ERASE1, you press EDIT which makes the entire sentence disappear. Press EDIT again, and the entire first word “the” appears. Press EDIT again and you see “the quik” on the screen. Use ERASE to change this to “the quick”. Now hit EDIT twice to bring in the words “brown” and “fox”. The final result is “the quick brown fox”. This takes longer to describe here in words, but pressing the EDIT key a few times is much easier and faster than doing all the retyping that would otherwise be necessary. The EDIT1 key (shift-EDIT) brings back the entire remaining portion of a sentence. For example, after inserting the “c” to make “the quick”, you could hit EDIT1 once to bring back “brown fox”. You should type some sentences at a PLATO terminal and study the effects produced by EDIT and EDIT1.
The COPY key is closely related to the EDIT key and is used mainly by authors. While EDIT and EDIT1 cycle through words you have just typed, COPY and COPY1 bring in words from a pre-defined “copy” sentence. These keys are used heavily when changing or inserting portions of a lesson.
he display “a2b” can be made by hitting “a”, then SUPER, then “2”, then “b”. SUPER makes a non-locking movement higher on the screen for typing superscripts. Notice that SUPER is struck and released, not held down while typing the superscript. Striking shift-SUPER makes a locking movement, so that the sequence “a”, shift-SUPER, “2”, “b” will produce “ a2b” . The SUB key is similar to SUPER. For example, the display “H2O” is made by typing “H”, SUB, “2”, “O”. A locking subscript results from shift-SUB, which is also what is used to get down from a locking superscript. Similarly, shift-SUPER will move up from a locking subscript.
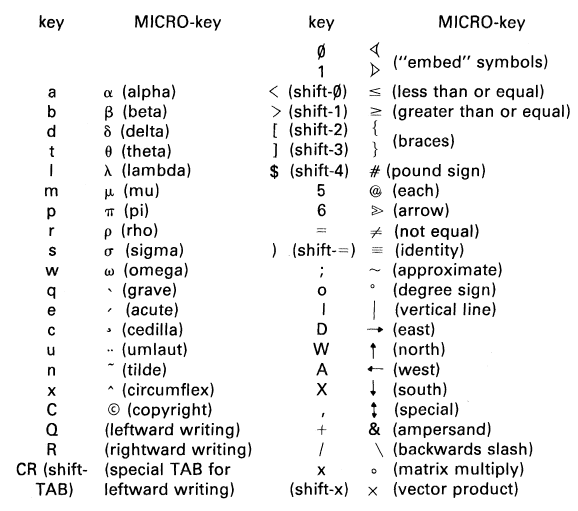
There are 34 additional characters not shown on the keyboard which are accessible through the MICRO key. For example, striking and releasing the MICRO key followed by hitting “p” produces a “Π” . The sequence MICRO-a produces an a. Typing “e”, MICRO, “q”, produces “è”, whereas typing “E”, MICRO, “q”, produces “É”. Note the “autobackspacing” which not only backspaces to superimpose the accent mark but also places the accent mark higher on a capital letter. Six MICRO options involve autobackspacing: `(q), ´(e), ¨(u), ^(x), ~(n), and ¸(c). The last accent mark (MICRO-c) is used for creating cedillas (c and c) and does not involve a different height for capitals. It is easy to remember these keys because of natural associations. The ` (grave) and ´ (acute) accent marks are on the q and e keys which have the ↖ and ↗ arrows marked on them. The umlaut usually appears on a “u” (German ü). The circumflex
The Greek letters α, β, δ, φ, λ, π, ρ, σ, and ω are produced by typing
MICRO followed by a, b, d, t, 1, m, p, r, s, or w. Here is a complete list:
These are the standard MICRO definitions. You can change these by setting up your own micro table. This is discussed in Chapter 9.
The standard character set includes all the characters we have seen so far, including the Greek letters and other characters accessible through the MICRO key. The shifted MICRO key, called FONT, lets you shift from this standard set of characters to another set of up to 126 special characters which you can design.
These special characters might be the Cyrillic, Arabic, or Hebrew alphabet, or they can be pieces of pictures, such as the characters and which form a car when displayed side by side. Unlike MICRO which only affects the next keypress, FONT locks you in the alternate “font” or character-set. You press FONT again to return to the standard font. The creation of new character sets is described in Chapter 9.
If the author activates it, the ANS key can be used by the student to get the correct answer to a question. This is discussed in Chapter 7. The shifted ANS key, TERM, when pressed causes the question “what term?” to appear at the bottom of the screen. At this point, you can type any one of various keywords in order to move to a different part of the lesson. The use of TERM is discussed in Chapter 5.
If you set up an optional help sequence, the student can press the HELP key to enter the sequence. The student can then press BACK (or BACK1) to go back to where he or she was when originally requesting help, or will be brought back to the original point upon completion of the help sequence. You could also specify a different help sequence accessible by pressing HELP1 (shift-HELP). The six keypresses HELP, HELP1, LAB, LAB1, DATA, and DATA1 can, if activated by the author, allow the student a choice of six different help sequences. You can also activate NEXT, NEXT1, BACK and BACK1, but these simply let the student move around in the lesson without remembering or returning to the original place. In other words, these four keys do not initiate help sequences. Usually, BACK is reserved for review sequences or similar situations where you want to back up.
The STOP key throws out output destined for the terminal. A useful example is the case of skimming through pages of text in an on-line catalog or collection of notes. If you decide you want to skip immediately to the next page, you might press STOP in order to avoid the wait required to finish plotting the present page.
The STOP1 or shift-STOP key plays a crucial role in PLATO usage. You press STOP1 to leave a lesson you are studying. When a student is ready to leave the terminal he or she presses STOP1, which performs a “sign-out” function. Among other things, the sign-out procedure brings the student's permanent status record up to date so that days later he or she can sign-in and resume working at the same point in the lesson. When an author presses STOP1 to leave a lesson that he or she is testing, the author is taken back to a point in the PLATO system where he or she can make changes in the lesson before trying it again.
The key next to HELP, with the square (□) on it, is similar to the EDIT key, but retrieves one character at a time, instead of a whole word. It is particularly useful when used in association with the EDIT key. The shifted square key is presently used as the ACCESS key, as described in Chapter 9.

